

If you have a Pool Ionizer Replacement Electrode, you likely want the water to be crystal clear and safe for swimming, without relying too heavily on harsh chemicals like chlorine. That’s where a pool ionizer comes into play. A pool ionizer helps sanitize your pool by releasing ions usually copper and silver into the water to inhibit the growth of algae and bacteria. Over time, however, the electrodes within your pool ionizer will wear out and need to be replaced.
This article will guide you through the entire process of replacing a pool ionizer electrode, ensuring that your pool stays in top condition. We’ll cover everything from how pool ionizers work, signs that your electrodes need replacing, and a step-by-step guide to replacing them. Let’s dive in!
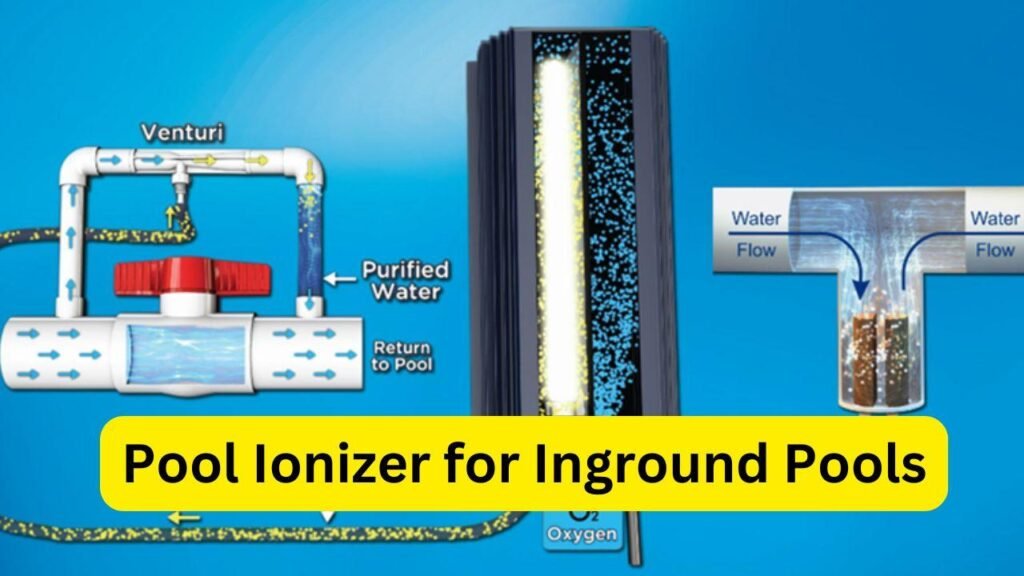
HowPool Ionizer Replacement Electrode Work
A pool ionizer uses an electrical charge to release metal ions (such as copper and silver) into the pool water. These ions naturally inhibit the growth of bacteria and algae, reducing the need for large amounts of chlorine or other chemicals. While the ionizer doesn’t eliminate the need for some chemical treatment, it drastically lowers the required amount.
Key Components of a Pool Ionizer:
- Electrodes: These are the metal plates (usually made of copper, silver, or a combination) that release ions into the water.
- Control Unit: This component controls the amount of electricity sent to the electrodes, regulating the ion output.
- Water Flow: Water needs to flow through the ionizer chamber for the ions to be released properly.
As water passes over the electrodes, the metal ions are released into the water, where they act as sanitizers. The ions disrupt algae and bacteria at the cellular level, preventing their growth and reproduction.
Signs Your Pool Ionizer Electrode Needs Replacing
Just like any pool equipment, ionizer electrodes do not last forever. Here are some telltale signs that indicate it’s time to replace your pool ionizer electrodes:
1. Visible Wear and Tear
One of the clearest signs that the electrode is failing is visible degradation. The electrodes may become thin, corroded, or pitted over time. When the metal plates show significant signs of wear, their efficiency decreases, and they won’t be able to release as many ions into the water.
2. Decreased Ion Levels
If your pool water test shows low ion levels despite the ionizer being active, it could be an indication that your electrodes are not functioning properly. Most pool ionizers have a control panel or monitoring system that allows you to check ion levels. If the ion output is consistently lower than recommended, it may be time to replace the electrodes.
3. Pool Water Quality Decline
When your pool water starts to show signs of algae buildup or increased bacteria levels, even though the ionizer is running, it’s a strong indicator that the electrodes are no longer effective. A greenish tinge to the water or algae growth along the walls and floor of the pool suggests the ionizer isn’t doing its job properly anymore.
4. Age of the Electrode
On average, pool ionizer electrodes last between 2 to 3 years, depending on how frequently the pool is used and how hard the system is working. If it’s been a while since you last replaced your electrodes, it’s wise to check their condition.
Choosing the Right Replacement Electrode
When it’s time to replace your pool ionizer electrode, you’ll need to ensure that you choose the correct replacement part. Here’s what to look for:
1. Compatibility
Not all electrodes are interchangeable. Be sure to check your ionizer’s model number and find an electrode that is specifically designed for your unit. Using an incompatible electrode could result in poor performance or damage to your system.
2. Material
Most electrodes are made from copper, silver, or a combination of both. Copper ions are more effective at controlling algae, while silver ions are better at eliminating bacteria. Some high-end electrodes may use both metals for more comprehensive pool sanitization. Be sure to choose an electrode that fits your pool’s needs.
3. Manufacturer Recommendations
It’s always a good idea to follow the manufacturer’s guidelines when replacing parts. Check the owner’s manual or the manufacturer’s website for recommendations on the best replacement electrodes for your specific pool ionizer model.
How to Replace a Pool Ionizer Electrode: Step-by-Step
Replacing a pool ionizer electrode may sound daunting, but it’s a relatively simple task if you follow the steps correctly. Here’s a step-by-step guide to help you replace your ionizer’s electrode.
Step 1: Turn Off the Pool Pump and Ionizer
Safety first! Before you do anything, make sure to turn off your pool’s pump and the ionizer unit. You don’t want any water flowing through the system while you’re working on it, and you definitely don’t want to risk an electric shock.
Step 2: Remove the Ionizer Cap
Most pool ionizers are equipped with a cap that covers the electrode chamber. Unscrew this cap to access the electrodes. Be gentle to avoid damaging the housing unit.
Step 3: Remove the Old Electrodes
Once the cap is off, you’ll be able to see the old electrodes. Carefully remove them from the ionizer. Some models may have screws or connectors that hold the electrodes in place, so you may need a screwdriver or other tools to remove them.
Step 4: Clean the Chamber
Before installing the new electrodes, take a moment to clean out the ionizer chamber. Over time, debris and mineral deposits can accumulate inside the chamber, potentially hindering the performance of your new electrodes. A simple rinse with water should do the trick.
Step 5: Install the New Electrodes
Now it’s time to install your new electrodes. Place them into the chamber, ensuring they are seated properly. If your ionizer uses screws or connectors, tighten them securely but not overly tight to avoid damaging the new electrodes.
Step 6: Replace the Ionizer Cap
After the new electrodes are in place, screw the ionizer cap back on. Make sure it’s snug and sealed properly to prevent any water leakage.
Step 7: Turn the System Back On
Once everything is reassembled, turn your pool pump and ionizer back on. Allow the water to flow through the ionizer and check the control panel to make sure the system is functioning correctly.
Step 8: Test the Water
After a few days, test your pool water to ensure that the ion levels are back to normal. If the ionizer is working correctly, your water should remain clear and free of algae and bacteria.
Maintenance Tips to Extend the Life of Your Electrode
Replacing electrodes can be an investment, so it’s important to take care of them to extend their life. Here are a few tips to help you maintain your pool ionizer electrodes:
- Regular Cleaning: Periodically clean your ionizer chamber and electrodes to prevent mineral buildup and debris.
- Check Ion Levels: Routinely check your pool water’s ion levels to ensure the system is working effectively. Adjust the settings as needed to prevent overuse of the electrodes.
- Proper Storage: If you winterize your pool, remove the electrodes and store them in a dry, safe place during the off-season. This can help prevent corrosion and extend their lifespan.
Conclusion
Replacing a pool ionizer electrode is a straightforward process that can dramatically improve the quality of your pool water. By keeping an eye on the condition of your electrodes and knowing the signs that they need replacement, you can keep your pool in pristine condition with minimal chemical use.
Now that you know how to replace a pool ionizer electrode, you can confidently maintain your pool’s sanitation system and enjoy crystal-clear water all season long.
More Stories
Legal Implications of Using a Virtual Office
7 Inspiring Startup Business Stories You Must Read
How To Remove Stains From Rugs Or Carpets